
SeerBit payment gateway integration in Salesforce-Commerce Cloud
The SeerBit payments cartridge offers a convenient payment solution, granting you access to SeerBit's payment gateway features with minimal integration effort, allowing you to begin accepting payments swiftly. You can seamlessly integrate SeerBit as the payment processor for your Salesforce Commerce Cloud (SFCC) e-commerce site, leveraging the Storefront Reference Architecture (SFRA) framework.
This document outlines the step-by-step process to integrate the SeerBit payment processor into your SFCC site:
Access to SeerBit Cartridge
Seerbit cartridge can be downloaded from this repository Seerbit Cartridge
- Request for access to the repository by clicking on Seerbit Cartridge
- In the repository you will find the following folders:
- Metadata
- App_custom_seerbit
- Clone the repository using the command:
- Git clone https://github.com/Humantech-solutions/seerbit-commercecloud/
- Open the package/metadata/seerbit_cartridge /sites/ folder in the Seerbit repository.
- Rename the yourSiteId folder to the ID of your site in your Salesforce Business Manager.
- Zip the seerbit_cartridge folder.
Business Manager Setup
Site 1: Site Import (If required)
- To import the Storefront Reference Architecture Demo Sites into your Salesforce Sandbox, follow these steps:
- Log in to your Business Manager.
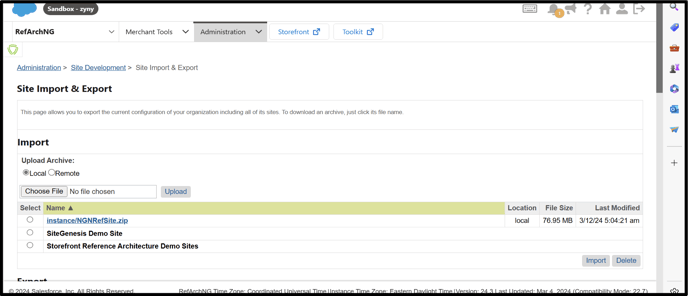
- Navigate to Administration → Site Development → Site Import & Export.
- Click on "Select Storefront Reference Architecture Demo Sites".
- On the page that appears, choose the storefront reference architecture site that you want to import. If you have your own site, you can select that as well.
- Click on "Deploy".
- Wait for some time as the import process may take a while, depending on the size of the site and your system's processing speed.
- Once the import process is complete, you will be able to see the reference sites in your Business Manager.
This process allows you to import demo sites or your own site into your Salesforce Sandbox for testing and development purposes.
Site 2: Import the MetaData
- Open the package/metadata/seerbit_cartridge folder.
- Zip the seerbit_cartridge folder.
- Select your site in your business manager.
- In the Business Manager, navigate to Administration > Site Development > Site Import & Export, and proceed to import the seerbit_cartridge zip file.
- After the upload process is finished, choose the recently uploaded zipped folder and then click on the Import button
- Following the import, attributes labelled Seerbit[attributeName] are included in the following section:
- Navigate to Merchant Tools → Ordering → Payment Processors. Here, you will find SEERBIT_PROCESSOR

- In the Merchant Tools → Ordering → Payment Methods section, you will find SeerBit. Please verify whether the SeerBit payment method is enabled. If it is not enabled, ensure to set its status to "Yes" to activate it.

- Additionally, the following services are introduced: app.seerbit.pay and app.seerbit.token. You can locate these services under Administration → Operations → Services.
- Navigate to Merchant Tools → Ordering → Payment Processors. Here, you will find SEERBIT_PROCESSOR
Site 3: Adding API Keys & URL in Business Manager
- Obtain Seerbit Public API Key and Seerbit Secret API Key from the Seerbit Dashboard (SeerBit - Merchant Dashboard).
- Navigate to Business Manager → Merchant Tools → Site Preferences → Custom Preferences → SEERBIT_PAY.

- Select SEERBIT_PAY and add the following keys: seerbit_private_key, seerbit_public_key, and seerbit_url. Save the changes.
- Set the Seerbit_url as following:
- URL: your-commercecloud-instance-url, adding /Order-SeerbitConfirm at the end, for example:
https://zyny-xxx.dx.commercecloud.salesforce.com/on/demandware.store/Sites-RefArch-Site/en_US/Order-SeerbitConfirm
Site 4: Setting up the Cartridge Path
- In Business Manager, go to Administration → Sites → Manage Sites. A new site should be visible.
- Click on the RefArch site, then select the "Settings" tab. Add the following cartridges under Cartridges:
"app_custom_seerbit:plugin_cartridge_merge:plugin_instorepickup:plugin_wishlists:plugin_giftregistry:lib_productlist:plugin_productcompare:plugin_sitemap:plugin_applepay:plugin_datadownload:app_storefront_base". - Select Apply to save the changes.
Cartridge code setup in Visual Studio Code
- Clone the Seerbit Cartridge repository from the following URL: https://github.com/Humantech-solutions/seerbit-commercecloud into your preferred Integrated Development Environment (IDE), for example, Visual Studio Code.
- Inside the root folder of the repository, locate a file named dw.json. Within dw.json, provide the hostname, username, password, and code-version. Below is a sample content structure of dw.json:
{

"hostname": "your-commercecloud-instance-url",

"username": "your-username",

"password": "your-password",

"code-version": "your-code-version"

} - Replace "your-commercecloud-instance-url", "your-username", "your-password", and "your-code-version" with your specific credentials and code version.
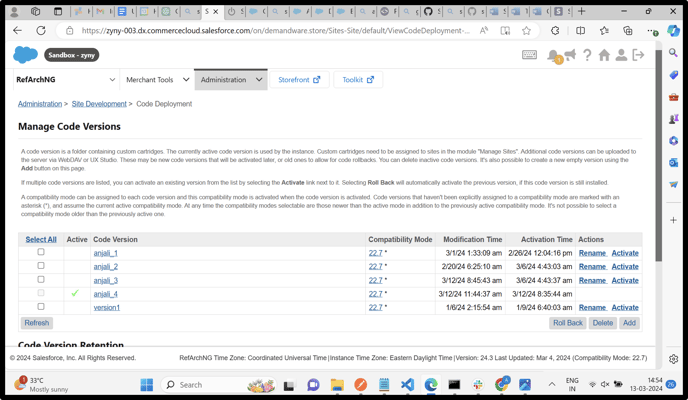
- To create the code version in the Business Manager, follow these steps:
- Navigate to Business Manager → Administration → Site Development → Code Deployment.
- On this page, click on the "Add" button displayed under code versions.
- Provide the same code version name as mentioned in the dw.json file.
- Click on "Apply" to save the changes.
- After creating the code version, select the newly created version from the list and click on the "Activate" button located in the "Actions" column corresponding to that row. This will activate the code version for use in your Salesforce Commerce Cloud instance.
- To create a launch.json file inside the root folder of storefront-reference-architecture-master and app_custom_seerbit cartridges, follow these steps:
-
- Open your preferred text editor or IDE.
- Navigate to the root folder of the storefront-reference-architecture-master and app_custom_seerbit cartridges.
- You need to add storefront-reference-architecture-master cartridge inside your folder. After adding inside your folder you can see two cartridges. Storefront-reference-architecture-master and app_custom_seerbit cartridges.
- Create a new file named launch.json inside the two cartridges.
- Below is a sample launch.json file:
{In the launch.json file, provide the hostname, username, password, and code-version based on your environment. Replace "-.dx.commercecloud. salesforce.com" with your Commerce Cloud instance's hostname, "example@gmail.com" with your username, "****" with your password, and "example_10" with your desired code version.
"version": "0.2.0",
"configurations": [
{
"type": "prophet",
"request": "launch",
"name": "Attach to Sandbox",
"hostname": "****-***.dx.commercecloud.salesforce.com",
"username": "example@gmail.com",
"password": "*******",
"code-version": "example_10",
"workspaceroot": "${workspaceFolder}"
}]
}
Code Implication and Installation Process
Step 1: Install Node Modules
From the root directory of your cartridge, use the command line to install Node modules by executing the following command: npm install
This command will automatically install all the necessary Node modules and dependencies specified in the package.json file within your cartridge's directory.
Step 2: Build Code
npm install sgmf-scripts

node node_modules/sgmf-scripts --help

npm run compile:js
Step 3: Upload the code to Business Manager
To upload the cartridges into your Business Manager, follow these steps:
- Ensure you have the ProphetDebugger extension installed in Visual Studio Code (VSCode). If it's not available, you can download it from the VSCode Extension Marketplace.
- Open Visual Studio Code.
- Navigate to the ProphetDebugger extension within VSCode.
- Use the extension to upload the cartridges into your Business Manager. The ProphetDebugger extension typically provides functionalities to facilitate this process directly from within VSCode.
- Follow the prompts and instructions provided by the extension to complete the upload process. This may involve connecting to your Salesforce Commerce Cloud instance and selecting the cartridges you want to upload.
By using the ProphetDebugger extension in VSCode, you can efficiently upload the cartridges to your Business Manager without leaving your development environment.
Verification Process
Note: If products are available on the site but are not displaying in the storefront, follow these steps:
- Go to Business Manager → Merchant Tools → Search → Search Indexes.
- Click on the checkboxes for all IndexTypes to select them.
- After selecting all IndexTypes, click on the "Rebuild" button.
- This action will trigger a rebuild process for all product indexes, ensuring that all products are properly indexed and displayed online on the storefront.
- The below picture is the reference for the storefront with all the products.

- Add products into the Cart, then click on the cart and now we can see the checkout like the below.

- Then click on checkout to provide the required details like mailId, address fields etc, click on makePayments button. Now you can see the two payment options one is Credit Card and the other SeerBit.

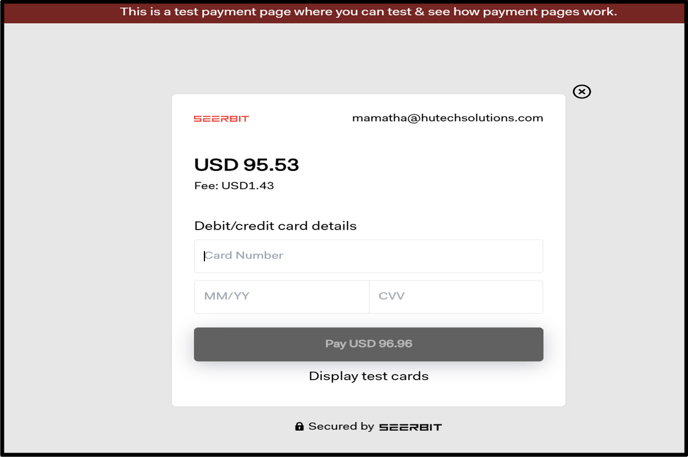
- To make payment using Seerbit payments, click on the Seerbit Payments radio button.
- You will be redirected to the Seerbit Payments page.
- In that page, you will be prompted to choose your payment method and click on the pay button.
- After completing the payment it will be redirected to the storefront page here we can see the Thank you page.


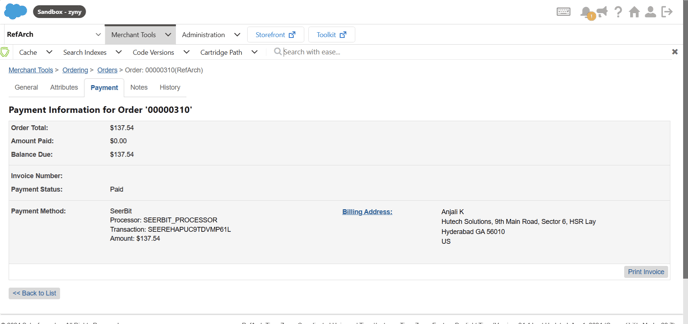
- In Business manager we can the Order Details.

- In order we can see the Payment details as well.
Conclusion
We trust this comprehensive guide has furnished you with clear instructions for integrating the Seerbit payment gateway into your Salesforce Commerce Cloud (SFCC) ecommerce site. By adhering to these steps diligently, you can seamlessly enable Seerbit as your payment processor and promptly begin accepting payments. If you encounter any challenges during the integration process, please feel free to reach out to our support team for assistance. Wishing you success and happy selling with Seerbit!